 |
| all PATTERNS 45% OFF |

Friday, December 23, 2016
Sunday, December 4, 2016
New Bunny owner- little cute baby girl //

Christmas is magic. Little Baby girl with Baby-Bunny girl.
More here: MarveBlog
Happy Christmas time!
Monika
Saturday, December 3, 2016
Stuffed Christmas //
Have made some Christmas presents- soft, stuffed and colorful cats and lambs.
You can do same using my patterns- you need to start Christmas planning now!!
You can do same using my patterns- you need to start Christmas planning now!!
Handmade is the new hot holiday gift--so start now to join the fun! You'll do less, enjoy it more ... with an organized Christmas!


Monday, November 28, 2016

Sunday, November 27, 2016

Saturday, November 5, 2016

Tuesday, October 25, 2016


Friday, October 14, 2016

Thursday, October 13, 2016

Tuesday, October 4, 2016
Sewing Machine Presser Foot Guide- for beginners. Did you know?

Which sewing feet should you use and when/where?
The sewing machine presser foot is the small attachment that usually smoothies and flattens the fabric as it is fed through the machine and stitched. There are lots of different presser feet for all kinds of sewing jobs. You will probably never need to use them all.

your sewing machine's presser feet
On most modern machines you can change the foot with a simple lever which allows the presser feet to be easily released and changed. The presser foot attaches to the presser foot holder which is held onto the presser bar, usually with a small screw. You shouldn't need to remove the presser foot holder except for maintenance.
Choosing the correct sewing machine presser foot for the job!
Choosing the correct presser foot for your machine can make all the difference to a project, and it’s good to know which kind are available and their uses. Presser feet work in combination with a specific stitch or range of stitches, or manipulate the fabric to allow you to sew a specific technique.

Every machine will come with a standard foot (also know as a zigzag foot). This foot has a pair of matching 'toes' either side of the needle. The standard foot will mainly be used for straight and zigzag stitching and some decorative stitches, depending on your brand of machine.

This comes as standard with most machines and has openings on both sides, which allow you to sew near to a zip on each side. You must alter the position of the needle depending on which side of the foot you want to use. It can also be used to sew piping.

This foot is indispensable to most quilters and dressmakers as it allows you to sew a perfect quarter-inch seam every time using the seam guide line duo along the edge of your fabric.

By using teeth similar to the feed dogs (found at the base of the machine that feed the fabric), this foot can also move the fabric from the top, making it great for thick, heavy fabric, or fabric that tends to stick. It’s also a quilter’s best friend!

Used in combination with your buttonholes stitches, this clever foot measures the button, which is inserted into the back section of the foot to create perfect buttonholes.

This is used mostly for free-machine sewing where the needles is used to create patterns and texture on fabric. It can also be used to top-stitch quilted projects. The feed dogs must be lowered to allow the fabric to move freely.

With open grooves on the underside, the piping or cording is held in position and passes through the foot in a straight line, creating even stitching.

Usually clear to aid visibility, and sometimes with an open toe, this foot is used for decorative and satin stitching as the foot allows a build up of stitches to be sewn on the fabric.
Teflon foot
Made using non-stick Teflon, to allow the foot to glide easily over laminated, vinyls, leather and suede, without the friction caused by a standard foot.

Blind hemming can sometimes be a little bit tricky so the blind hem foot goes some way to helping improve this technique. The foot has a metal guide in the center and three grooves on the underside. During blind hemming, the fold of the fabric fits snugly against the fuide in the foot for accuracy wile the groove underneath help to prevent unnecessary slipping. The needle swings over the metal guide creating slack in the upper tension so that the pick of the stitch is almost invisible.

The pintucking foot is used with a 2mm twin needle to create multiple rows of pintucks. The grooves on the underside of the foot make it easy to stitch several rows parallel and evenly spaced from each other.

As with beads and pearls it is now so much easier to attach ribbons and even sequins with the help of our special ribbon/sequin foot. This foot is designed with guides through which ribbon or strung sequins can be inserted and it will allow them to feed through evenly as you sew. Besides affixing the ribbon, a wide ladder stitch can be used with narrow ribbon to make an easy and functional drawstring.
AND MORE......


Top Tip!
Our top tip when you change your sewing machine's presser feet, is to put the foot you are taking off immediately back where it belongs. There's nothing quite so frustrating as wanting to sew up a zip and not being able to find the right foot in your sewing box!
Which sewing machine foot could you not live without?
Read about:
- WHAT DO YOU USE FOR TOY STUFFING?
- TIPS FOR STUFFING
Read more from: http://www.lovesewingmag.co.uk/
Visit my patterns shop: DIYSTUFFIES
Tuesday, September 20, 2016
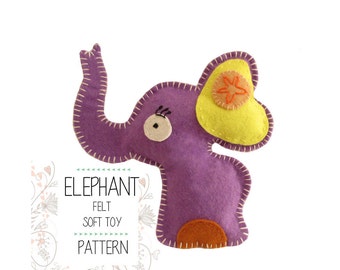
New! Penguins PATTERN

I love them! So cute to play! Sew them today!
Penguin mother with her baby Penguins, you will love them!
Find PATTERN and sewing instructions here:
http://etsy.me/2guPqQm
Find PATTERN and sewing instructions here:
http://etsy.me/2guPqQm

These felt Penguins are easy to sew - you really just need:
- A felt
- Hand sewing needle and scrissors
- Cotton embroidery thread
- and Toy wadding or stuffing
* Just message me to have Coupon Code and save 20%!

Thursday, September 15, 2016
What am I inspired by?

All of the toys I make are created to be played with by children. In fact, my toys are played with by children.
Take one step into my home and you’ll find my toys and creations everywhere. Each toy is created for my sewing patterns and then passed straight from my hands, lovingly into the arms of my Georg. So I guess you could say that all of these toys are child tested and approved!
So, what would you like to sew today?
Monday, September 12, 2016
Autumn sale september

♡ ♡ ♡ ♡ ♡ ♡ ♡ ♡ ♡ ♡ ♡ ♡ ♡ ♡ ♡ ♡ ♡ ♡ ♡ ♡ ♡ ♡ ♡ ♡
These are so quick to make, you can make one for all your friends! Happy Sewing!
Sunday, September 11, 2016
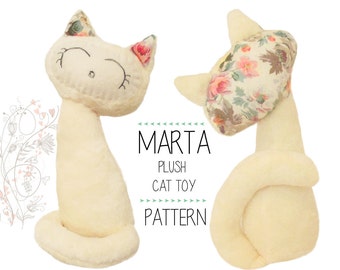
Daisy cat sewing pattern with instructions
Hi, we have not seen each other in a long time. Georg was a little ill and we spent time together in hospital.
So, I had time to update our pattern instructions, in order to make them more comprehensive and easier to follow. And....
... THANK YOU so much for trying my soft toy patterns. Thank you for all your nice comments, e-mails and shop reviews on these patterns. I AM SO VERY HAPPY!!!
Cats news: The Daisy pattern (as you can see on the above picture, this is the jacket I have included in the cat pattern!!) is finally again at the shop now !!! Made with love and a lot of care YAY !!! Easy to follow :)


Go make your Cat or Bunny, and get ready for our next meeting here in few days, …. xoxo
So, I had time to update our pattern instructions, in order to make them more comprehensive and easier to follow. And....
 |
| Daisy cat sewing pattern |
... THANK YOU so much for trying my soft toy patterns. Thank you for all your nice comments, e-mails and shop reviews on these patterns. I AM SO VERY HAPPY!!!
Cats news: The Daisy pattern (as you can see on the above picture, this is the jacket I have included in the cat pattern!!) is finally again at the shop now !!! Made with love and a lot of care YAY !!! Easy to follow :)


Go make your Cat or Bunny, and get ready for our next meeting here in few days, …. xoxo

Thursday, July 28, 2016
Felt Penguin sewing pattern
 |
| Sew simple, Sew fun Its July, but penguins are active, me too. New penguin pattern is coming, its simple and fun to sew!  |
Stitches- Running stitch
 |
| Running stitch |

You'll want to start by threading your needle and knotting the end(s) of the thread.
For the running stitch: bring your needle up through the fabric from the back (or wrong side, whichever lingo you prefer) until the knot hits the fabric. At this point, you'll simply make a stitch to the left or right of where the thread came through. Then bring the thread back up and start all over again! (You can either do the standard up and down, or push the needle through and make several stitches at once.) When you come to the end, simply knot on the back side of your work.

Subscribe to:
Posts (Atom)